Getting started
Pre-requisites
We’ve done everything we can to make configuring and using Corrected Cloud as straight forward as possible. To that end, to get started all you will need is:
- Administrative access to the AWS account you want to monitor
- CloudTrail enabled with a trail in the account to be monitored
Whilst AWS CloudTrail events are enabled by default for all accounts since August 2017, this does not create a trail. We need a trail created to be able to receive change events in real time, allowing us to provide alerts within seconds of a problematic configuration being created. AWS do not charge for the first trail in your AWS account, and we do not require anything more than this. If you are using AWS Organizations, you can create an Organization wide trail. Corrected Cloud can utilize this if it is enabled.
If you do not have a CloudTrail trail in your account, you can create one via the AWS web console CloudTrail page. The defaults provided by AWS when creating a trail in the console are sufficient for Corrected Cloud. Consult the full AWS documentation on creating a trail if you would like more details.
Adding Corrected Cloud to an account
To add Corrected Cloud to your AWS account, sign in to the Corrected Cloud interface and select Add AWS Account from the left bar.
We generate an AWS CloudFormation template which configures everything necessary to enable Corrected Cloud in your account. For full details on what access this provisions, see What access do you have to my account?.
Provisioning a single account
To add Corrected Cloud to a single account, select ‘Single account’ and click Next. From here, you can click Launch to open the AWS CloudFormation console with all necessary data pre-filled to allow you launch the CloudFormation stack.
From this page you are also able to download the template to review or to launch manually.
Provisioning via AWS Organizations
You can also add Corrected Cloud to multiple accounts within your AWS Organization. Adding Corrected Cloud in this way will automatically deploy Corrected Cloud to newly created accounts, allowing you to easily ensure security oversight across all accounts.
Provisioning via AWS Organizations is also done via CloudFormation, this time with a template which should be launch in the Organization master account.
You can choose to deploy to your entire AWS Organization, or to specific Organization Units within the Organization. When Organization is selected for the template type you must enter one or more Organization Unit IDs, or the ID of the Organization root. Entering the Organization root will deploy to all accounts within the Organization.
You can find Organization Unit and root IDs via the AWS Organizations console. See the AWS Organizations documentation for further details.
Verifying account addition
Once you have launched the CloudFormation template you should view the Verify screen to ensure that your account(s) has/have been successfully added.
If there has been an error adding your account, for example because you do not have a CloudTrail trail configured, it will be displayed here.
Findings
Findings are the core of Corrected Cloud. They tell you about the problems we have found, and the work we suggest you do to improve security in your AWS environment.
Findings Summary
The findings summary is a good way to get an overview of the problems that exist within your environment. Here you will discover findings across all monitored AWS accounts, group by finding and with the severity clearly displayed. This can help you identify and formulate a company-wide strategy for addressing problems happening across multiple teams.
Findings Detail
The Findings Detail report allows you to know the specifics of the findings discovered in your environment. Use this screen to understand problems we have found in more depth.
Findings Report
The Findings Report provides a full document outlining the findings for your account. It is a written report of the kind you might receive after a security professional has audited your AWS environment - but updated in real time.
Notifications
Your can configure a notifier to provide notifications when new findings are
created or resolved. You can use filters if you only wish to be
notified on certain types of alerts - for example, only alerts above a certain
priority, or only for accounts that have a name containing -prod.
Adding new notifiers
Notifiers can be added at a team or user level.
When added at a team level notifications will be raised for all accounts the team has access to.
When added at a user level, notifications will be raised for all accounts you have access to.
Multiple notifiers of the same type can be added, for example you could add multiple email notifiers to email multiple people.
Notifier types
Use this notifier to receive an email whenever a new finding is raised, and optionally also when a finding is resolved.
Slack
Get a Slack alert when a new finding is raised, and an update when it is resolved.
You must add the Corrected Cloud bot to your Slack workspace for this notifier. To do this, simply click ‘Add to Slack’ on the Slack notifications page (step 2) and select ‘Allow’. Once complete, click the refresh button beside the Slack channel list and then select the channel where you wish to receive notifications.
PagerDuty
Use this notifier to have a PagerDuty alert raised on a new finding. The alert will automatically be resolved when the finding is resolved by Corrected Cloud (ie, once the problem no longer exists).
To add a PagerDuty notifier you must grant us access to send notifications to one or more PagerDuty services. To do this, add the notifier by selecting PagerDuty from the list and you will be presented with a list of available PagerDuty services.
If you have not previously authorized Corrected Cloud to send PagerDuty notifications, or you do not see the PagerDuty service you wish to send notifications via, click the Add PagerDuty services link. This will open the PagerDuty connection authorization screen in a new tab, an example of which is shown below.
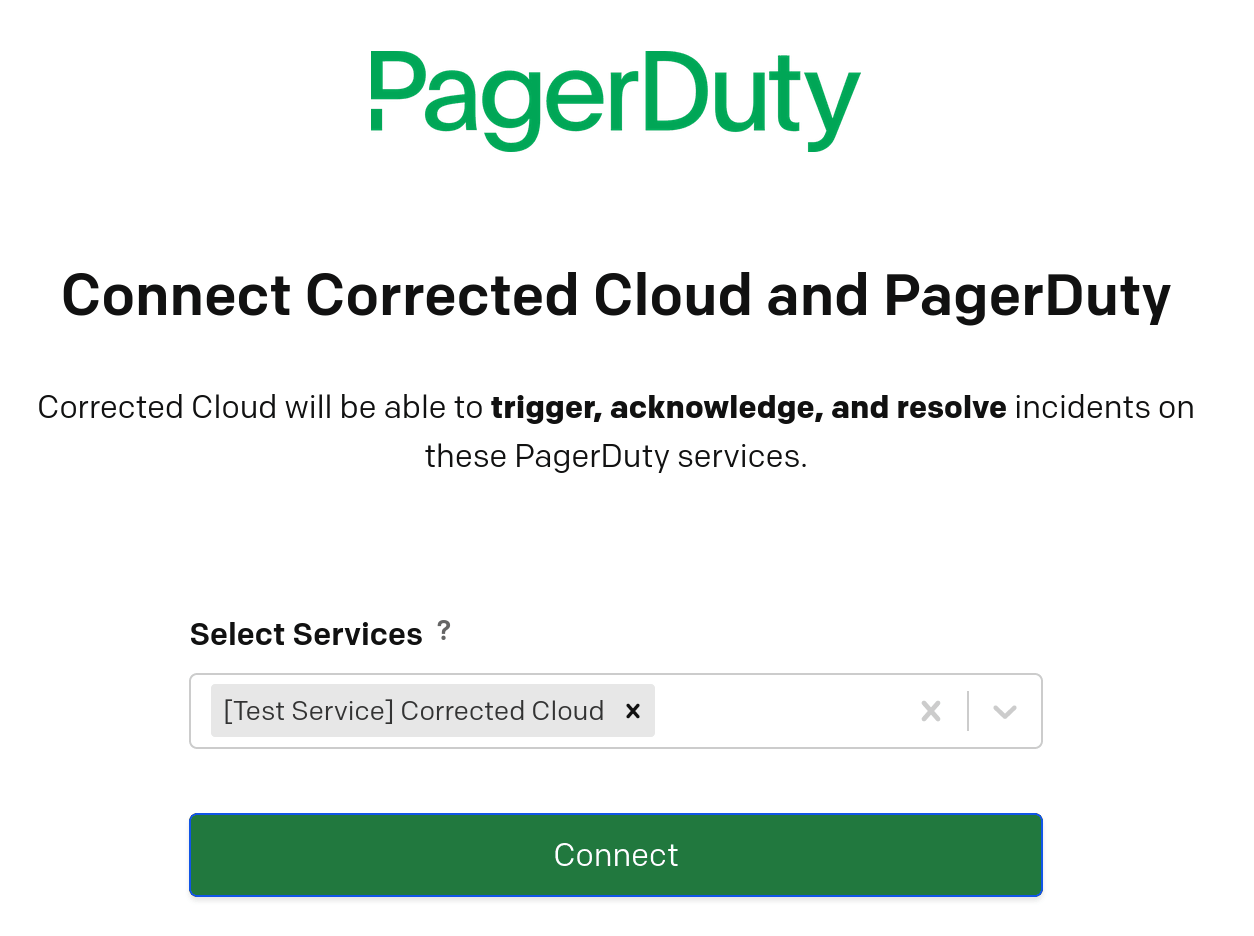
Select one or more services to be used, and click Connect. You will be redirected back to Corrected Cloud, where you should see that the connection has been correctly configured. You can now close this window and click the refresh icon to reload the list of available PagerDuty services. The PagerDuty service or services you authorized will now be available in the list.
Filters
Priority Filters
If you wish to only receive notifications for findings of a particular priority then you can accomplish this via filters. This can be particularly useful when combined across multiple notifiers. For example, you may wish to receive PagerDuty notifications only for findings of High and Critical priority, emailing the team for findings of a lower priority.
To configure notifications in this way, you would select High as the Minimum Priority on the PagerDuty notifier, leaving Critical as the Maximum priority. You would then select Informational as the minimum priority on the email notifier, with Moderate as the Maximum priority.
Account name filters
Accounts name filters are useful when you have a large number of accounts named in a consistent way and wish to only receive alerts relating to a subset of these.
As an example, you may name all accounts relating to the finance department in
the form finance-nonprod-app01 and finance-prod-app01. To raise
notifications only on production accounts for the finance departments, enter
finance in the Account name includes field, and nonprod in the Account
name does not contain field.
Audits
Audits allow you to view resources and permissions within your environment. With it you can understand what exists, and who can access it.
Admin Audits
The Admin Audit report gives you a full list of resources with direct administrative access within your account. This includes users, roles, and resources which can assume administrative roles (for example EC2 instances and Lambda functions).
This report does not include resources which may be able to grant themselves administrative access via IAM privilege escalation. These are detailed in the finding report.
S3
S3 audits allow you to view resources which can access a given S3 bucket.
Select the bucket you wish to audit from the drop-down, or start typing the bucket name to narrow the list.
Select ‘Read’ or ‘Write’ depending on whether you are interested in knowing who and what can read or write to the bucket.
Appendix
What access do you have to my account?
If you’re considering adding a third party tool to your account it’s a good idea to understand the level of access that tool has to your AWS accounts and your data. In the case of Corrected Cloud, we do everything we can to minimise the level of access we have to your environment.
In order for Corrected Cloud to produce useful findings, we need metadata about your environment. We need to know what resources you have in your account, and how they are configured. This would include items such as the existence of a database instance, the name of that database instance, the IP address used by the instance and the tags associated with it. We do not have any access at all to the data contained in the database.
Below, we have tried to include as full details as possible on what permissions we have. For the most complete technical details on how we implement this, please see a sample template.
Account data
We use two methods to discover the resources in your accounts, which can be categorized as push and pull.
Pull is when we make calls to the AWS APIs requesting information about the resources in your account. We do this when a new account is added to Corrected Cloud, and then infrequently afterwards. To do this, we use the AWS prescribed method of having a role in your account which we can assume. This role is configured with an ‘External ID’ which is specified by us and unique to each customer. We are very careful to ensure we not only do not look at any data in your account, but that we do not have access permissions to do so.
Push is when your account sends details of configuration updates to our API. Amazon provide logging of all configuration events via a service they call CloudTrail. We use another service, AWS EventBridge, to send all CloudTrail events relating to configuration updates to our API via HTTPS in real time. This is our primary mechanism for evaluating your infrastructure, and allows us to generate alerts within seconds of a problem being introduced.
For customers who are particularly sensitive about even metadata leaving their environments, we are able to provide a solution fully deployed inside your own AWS environment. For further details, please speak to our enterprise sales team.
Corrected Cloud Provisioning
In order to configure the role for us to assume, and appropriate AWS EventBridge rules to forward change events to our API, we provide a CloudFormation template which we generate based on your usage scenario.
You provision this template using your credentials - this avoids the requirement for Corrected Cloud to have any sort of ability to create resources in your account.
Because CloudTrail events are regional we need to configure EventBridge rules in each AWS region. To facilitate this, the CloudFormation template we provide creates a CloudFormation Stack Set, which then deploys a further CloudFormation template in each region. Depending on the type of deployment being used, the first template may include roles to deploy these further CloudFormation templates. These roles are used only by the CloudFormation Stack Set, and are not accessible by Corrected Cloud.
An organisation wide template can be generated - in this case the template should be deployed to the AWS Organizations root account, which will then deploy this to either all accounts, or all accounts under the specified Organizational Units. This has the advantage of ensuring that newly created AWS accounts are automatically protected by Corrected Cloud.